
If you haven't read yet, this project is about reviving an old Mac Mini from 2011 and turn it into a functional macOS Home Server. In the following post, 2 options will be discussed for external storage with different purposes:
- Which option is appropriate for valuable information that you can't afford to lose.
- Which option is appropriate for content that can be easily downloadable (again and again) from the internet.
Keep reading to find out these options suitable for the macOS Server 2011. To learn more about storage drives for home servers, click in the link below:
Table of Contents
Reliable External Storage: RAID 1
All the important files that can’t be lost, should be backed up appropriately. Since 1 hard drive could have a mechanical failure, it’s important to have these files synchronized in 2 (or more) storage drives.
The RAID 1 configuration is the most appropriate one because two or more hard drives are configured to replicate the same data on each one.
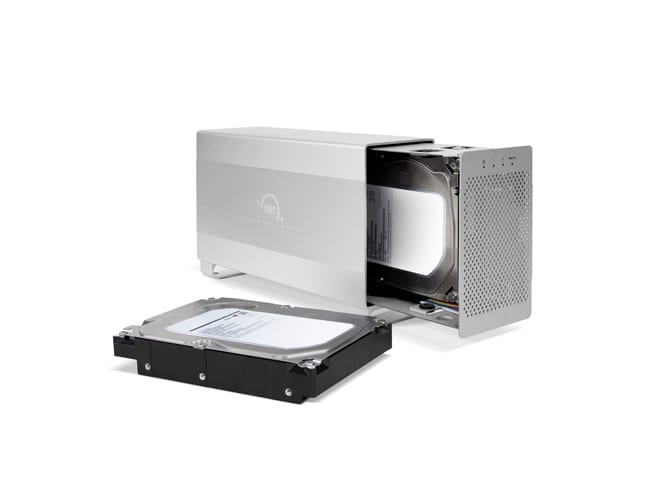
I'm going to use the OWC Mercury Elite Pro Dual with the USB and FireWire option to take advatage of the FireWire port from the macOS Server 2011.

Setup of this External Storage


Out-of-the-box, the hard drives comes configured as RAID 0. For this purpose, the hard drives are going be re-configured as RAID 1, renamed and the data will be encrypted.
From RAID 0 to RAID 1
The external hard drive comes preinstalled with RAID 0. Fortunately, a “Quick Start Guide” was included. I just had to move a round switch and press a button for 3 seconds in order to change the configuration. This process formats the hard drives and therefore DESTROYS THE DATA INSIDE. Be careful to not place any information inside as you do this.

Name and Encryption
When you connect the hard drive to the computer, a warning shows up explaining that the drive couldn't be read. This was expected since I obliterated all the information inside. Click on the left option, which will start the Disk Utility app.


In the picture below you see the external storage highlighted. Click on Erase to begin the formatting. Choose the name that you would like; I will name it “Mirror HDD“.
Next, choose the format APFS (encrypted). You will be prompted to fill out the password two times (so you make no typos). You should give a hint to the password, just in case you forget it. Leave the GUID partition map as default. When you click on Erase, the process will start right away.


Why encryption? Because you are going to place important files here, right? Take a couple of minutes to read this article about encryption for small businesses (applicable for homes too).
Volatile External Storage: RAID 0 or Independent
Another good idea for an external hard drive is to serve content or information with speed. This could be the information from cached content, storing movies, computer programs, video games and TV series. If you could download them again easily, then RAID 1 is pointless for this purpose. Therefore, you could use a RAID 0 or independent hard drive, since data loss could be tolerable.
Setup of the Volatile External Storage
This process is quicker than the RAID 1. Just insert the new hard drive in the enclosure (watch this step-by-step video tutorial) and format it as APFS without encryption.
I'm going to use the OWC Mercury On-The-Go to reuse the old, used hard drive that originally came with the macOS Server 2011.


Next Chapter
Now that we have covered the external storage for the macOS Server 2011, let's install the OS on the Mac Mini and start the services. Click on the following link to continue reading:
techZorro's Index of Content
Keep Reading!
- 007 – The outstanding Internet Protocol Layers and its hidden way to work
 Which protocols are used in internet? This episode talks about TCP/IP or Internet Protocol Layers required to work. Click here to listen.
 - 003 – Wi-Fi vs Ethernet, Convenience vs Reliability?When should a wired or wireless network be used? Let's discuss the differences between Wi-Fi and Ethernet. Click here to listen.
- The outstanding Internet Protocol Layers and its hidden way
 What is Internet Protocol or TCP/IP and how does it work? The Internet Protocol Layers are explained in this post. Click here to read.
 - Ethernet vs Wi-Fi
 When should a wired or wireless network be used? This post presents a brief comparison of Ethernet vs Wi-Fi. Click here to read.
 - Optical Media for the macOS Server 2011
 Build your media entertainment solution with optimal media and a Mac Mini. CD, DVD and Blu-ray discs are covered. Click here to read more.
You have reached this far!
Thank you for reading the blog post. Your comments and suggestions are welcomed. At the bottom of this page, leave a message or just say hi! The whole team of techZorro will appreciate it. Don't forget to share it on social media as well.
techZorro’s Index of Content
Click on the following link to browse likewise content in the blog in techZorro. This index will help you see what you are looking for in a bird’s eye view.
techZorro's Newsletter!
If you enjoyed this blog post, please subscribe to techZorro’s newsletter so you don’t miss any future blog posts!
[…] It doesn’t matter. This content will be the eventually replaced and it will be outdated. In this blog post, I talk about a “volatile external hard drive“, useful for this […]